Saturday, 28 December 2013

Review: Australis "Rub - A - Dub - Dub"

Hello to all my Lovely People out there!

Today I am sharing with you the delightful "Rub-A-Dub-Dub" by Australis.


This creamy pastel yellow is truly a delight for the eyes, it brings me memories of daisies and pleasant summer and spring days. It is a warm and sunny colour that is strongly pigmented.


Unfortunately the formula is a bit runny but it goes on like a dream and is opaque in 4 coats, though the 4th coat was to ensure even coverage. I love pastels and this one was one of the first polishes that I bought when I was starting to seriously get into nail art and polish collecting.

This polish is seriously a must-have. It is available as a part of Australis' regular range so it can be purchased at most pharmacies and and department stores near you.

xoxo
Queen Bee


Tuesday, 24 December 2013

Review: Australis "Bombshell"

Hey all you lovely people!

Today I am reviewing one of my favourite polishes and one of my go-to colours for a quick manicure.


"Bombshell" by Australis intense Barbie pink polish is a highly pigmented, creamy dream. It is really easy to apply and looks beautiful against pretty much any skin tone. It also looks just as vibrant on both nubbins and long nails.


"Bombshell" can be found at pretty much any pharmacy or department store (I mainly purchase my Australis polishes from Target and Big W). It makes for an striking statement manicure and is opaque in 2 coats. One problem that I have found is that some of the colour from the polish transfers onto the top coat brush when I apply the top coat.

I would definitely recommend others to try this polish, it provides a statement all on its own and can be used in all seasons as a bold colour in summer or a polish to warm up a winter wardrobe. So definitely put this on your wish list.

xoxo
Queen Bee

Tuesday, 10 December 2013

Savvy Polish Reviews: Part 1.

Hey to all you Lovely People,

I'm going to mix it up for you all today and take a break from all the bulk Essie reviews to show you an awesome Australian brand called Savvy.

Savvy polishes can be bought at any Priceline Pharmacy within Australia. These polishes are of really good quality and they are only $1.00 per polish which is perfect for any nail addicts budget.

The following polish reviews are a small portion of the Savvy polishes that I own, there definitely will be other posts reviewing the rest of my collection.

Sally Hansen: Ginger Ale.


"Ginger Ale" is a light and refreshing gold glitter polish that contains a majority of micro light gold glitters and a small scattering of larger hex glitters to add a bit of variety.


This polish would be perfect as a glitter topper but I managed to get the look above by applying roughly 3 coats. As you can probably see I really like this glitter and have used it many times. I highly recommend this polish for those who are on a budget but also want quality.

Savvy: Flaming Blue.


"Flaming Blue"is a semi-translucent, navy blue jelly polish that has a subtle blue to green duo chrome effect.

This polish is great quality for a budget price, although you wouldn't think that it is a transparent jelly, instead of a really pigmented opaque polish. This is a great thing because you can use it on its own and also can be used for a jelly sandwich with a difference.

The duo chrome that is visible in the bottle is really subtle once is on the nail but also allows for a pleasant surprise that occasionally catches your eye when the light hits it. I hadn't been using it that much, but looking back, think I will be using this one a lot more.

Savvy: Green Tea Martini


"Green Tea Martini" is a forest green polish with a subtle green shimmer. It is really pretty both in the bottle and of the nails but is a lighter green once applied on the nail.


This deep green polish looks amazing on short nails, it also looks incredible against my pale skin. The green shimmer makes it look a lot luxurious and turns it sort of into an Emerald richness. It was opaque after 2 coats, although it photographs lighter than in person, it is definitely worth a try.


**UPDATE**
Once I had removed the polish, I noticed a bit of staining on the cuticles and a slight staining on the nails (Although this was removed easily using a stain removing home method).

Please stay tuned for more installments!

xoxo
Queen Bee

Sunday, 8 December 2013

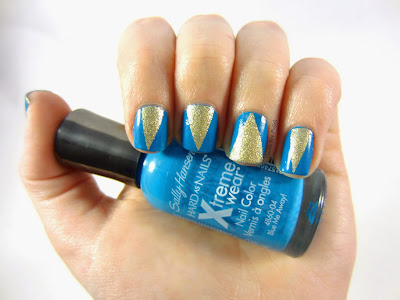
Review: Sally Hansen "Blue Me Away".

Hello My Gorgeous People!

Today I am reviewing Sally Hansen "Blue Me Away".


I used "Blue Me Away" as part of the above tape manicure with Orly "Honey Ryder".


This polish is a vibrant, bold blue that is perfect for a summer manicure that is a little bit different. The application is really smooth and even, it is a strong colour and only needed 2 coats to become completely even and opaque. The drying time is really impressive as I found it dried a lot faster than some of my other Xtreme Wear Sally Hansen polishes.

One problem that I had with this colour is that even though the polish was completely dry when I applied my tape some of the polish ripped off when I was removing the tape. I'm not sure if this problem was user error on my behalf or due to the polish.

**Update**
Now that I have removed the polish I have noticed that it unfortunately permanently stains the nails, surrounding cuticles and skin. (Please excuse the crappy condition that my nails are in, these were taken pre nail care ritual)


Talk to you all later!

xoxo
Queen Bee

Thursday, 5 December 2013

Review of L'Oreal: Lush Tangerine.

Hello to all my lovely people!

This post here is to show you all my 'Summertime Daisies' manicure and to review L'Oreal's "Lush Tangerine".

 
I absolutely loved creating this design, it is bright, sunny and reminded me of summer and warm weather. Best of all, it was easy to create.

L'Oreal "Lush Tangerine"

After applying my base coat (I use Duri Rejuvacote) I applied two coats of L'Oreal "Lush Tangerine", a strong, sunny orange. I found it extremely easy to work with, it had a smooth formula and applied evenly and strongly coloured, it also had a very impressive drying time, allowing me to create this look in a short period of time.

I noticed that the newer polishes (including "Lush Tangerine") come in 5ml bottles, which I find is a bit too small for a decent polish as most other brands have polishes that are around the 13ml mark. I'm not sure what made L'Oreal only sell 5ml bottles and not include larger bottles as well but this fact makes me feel like I shouldn't use the polish as often as I want to for full manicures instead of accent nails (which is what I do for most mini polish bottles), which is a shame because I absolutely love all of the colours in their various ranges.

Despite this, I really enjoy working with L'Oreal products as they are always of a good standard and definitely are worth their price.I have never had any problems with staining or quality issues, which is why I have a fairly large range of L'Oreal polishes.  L'Oreal products can be found in most department stores and chemists though the ranges that are available vary from store to store.

xoxo
Queen Bee

Monday, 18 November 2013

Review: Orly "After Party".

Hey to all my lovely people!

Today I'm going to be showing and going through my crazy tribal look and the base polish used to create the look. You can see the results below.


I used Orly "After Party" as the base coat for this look, it is a gorgeous and sultry deep blue with pink, purple and blue shimmers. I loved the look of this polish from the first time I saw it, it kind of reminds me of a nightclub on my nails, dark yet with the constant presence of coloured light.

After Party is absolutely amazing to work with. It applies really smoothly and only took me 2 coats to get it completely opaque. It has an impressive drying time, it didn't take long at all for each coat to completely dry which allowed me to complete this manicure in just under an hour from base coat to top coat. I don't recommend using this polish if you have your aircon/fan on in the same room, it will dry out too quickly and produce an uneven look, I did this when I first bought it and thought that it was the way it applied and shoved it to the back of one of my Helmer drawers. I'm really glad I revisited this one as it is such a gorgeous colour and is unique.

The removal of the polish is awesome, it comes off with nail polish remover and doesn't need to be soaked off using the foil method like a glitter would (BONUS! Sparkly polish without the drama!).

If you are looking for a sultry polish with a little bit of extra drama, then this polish is for you. You can pick up Orly at selected pharmacists and department stores. Just head over to their website to find your nearest stockist or to order online.

See all of you beautiful people later...

xoxo
Queen Bee.

Wednesday, 13 November 2013

Review: Emily de Molly "Speckled Pig".

Hey Lovely People!

Today I am reviewing "Speckled Pig" by the amazing Emily de Molly.


**(Please excuse the terrible aspect ratio of this picture, I cropped it for Instagram before I remembered to save a copy for the blog!)**

Emily de Molly: Speckled Pig.

Emily de Molly is an Australian Indie nail polish brand that sells her creations through Etsy (Australia Only) and Llarowe (International Sales). She is absolutely amazing to buy from and it is really hard to pick between all the polishes she creates, they are all so incredibly gorgeous (not to mention affordable too!)

This unique polish comprises of a creamy pink base with tiny matte black circular glitter. The pink is a gorgeous rosy pink and is opaque in two coats. The black glitter provides a refreshing change from all the sparkly glitter bombs that are popular with indie brands (not that this girl doesn't mind a good glitter bomb). 

The formula is a dream to work with, going on smoothly without any fuss or fishing around the bottle to get enough glitter out to make it look amazing. There isn't a strong odour to it so it is perfect for those that tend to get overwhelmed by some of the stronger smelling indie formulas. It is "3-free" meaning that the polish does not contain the harmful chemicals Touline, Formaldehyde and DBP (Dibutyl Phthalate). 

I am definitely glad that I picked this baby up, pretty much, I drool over anything that Emily de Molly makes but I love this polish because it's a fun and unique colour and glitter combination and has endless possibilities for straight manicures and nail art. I strongly suggest that you pick up a bottle for yourself as it is an amazing addition to any polish fanatic's collection.

xoxo
Queen Bee

Monday, 11 November 2013

Midnight Manicure Madness!

Hello Lovely People!

As you would have seen in a previous post, I am currently on doctor-enforced bed rest. Now, you would think that being stuck in a bed would be awesome! Staying in your PJ's until mid-afternoon, being able to nap whenever you want, having people wait on you hand and foot... I'm here to burst your bubble... It SUCKS! Yeah, those things are entertaining for a few days but this has been forced on me for a 5th time in 2 years, I would give anything to go for a walk!

Anyway, back to the subject, bed rest also means that your body clock is all upside down... so I found myself painting my nails while deliriously tired at 3am a few weeks ago. This is the outcome:


The main thing I see when I look back at this manicure is "who needs to have matching hands anyway?" in fact, I believe that was the caption written under this image when I posted to my personal Instagram (@princesslea89).

The main thoughts that I had when coming up with the design was that I wanted something bright, which I got from Ulta3: "Fruit Tingle" an incredibly bright and gorgeous hot pink. I was also wanting to mess around with various geometric designs that I had seen on other polish blog pages. I am the first to admit that when it comes to the intricate, detailed nail art that I have absolutely no hopes or skills to speak of, so I tend to stick to the abstract, geometric and simple designs.

The left hand (top hand) in the image was created by using the tape manicure method, where you paint your base colour, wait for it to dry completely, tape up the areas you wish to keep that colour and then paint over the exposed areas with the alternate colour you want in your design. After you have done this, peel off the tape covering the base colour and 'hey presto!" you have a tape manicure! 

I also used a black striper polish by Jordana called "Black Mark" to clean up the edges between the colours and to make the pink stand out brighter.

The right hand (bottom hand in the image) was made by simply painting the whole of the nail in white (Sally Hansen: "Whirlwind White"), waiting for it to dry, painting the fruit tingle over the top (the white gives the neon a stronger 'POP!") and then painting a diagonal white stripe across each nail using another Jordana striper polish called "Contemporary White" and lining along each side of the white with the Jordana black striper.

I then topped everything off with a coat of Essence Quick Dry Topcoat to seal in the colour and prevent chipping and I was done!

I really like this manicure and I was complemented on it quite a few times during the time that I wore it, many people found it comical that my hands didn't match. So I say, if you have something completely weird that you want to give a go, DO IT! you never know how the results will come out, you may love it, you may hate it and want to take it off immediately, but that is the great thing about polish. A cotton ball, some polish remover and you are ready for your next design!

I would love to see some of your designs out there so link me on Instagram with both @princesslea89 and @queenbeepolishes and I will take a look, who knows, you may just inspire one of my new projects!

xoxo
Queen Bee


Wednesday, 6 November 2013

Springtime Pastels Manicure.

Hey lovely people!

As I promised, here is the outcome of all those polishes that I posted last night...

 
Ta Da!


Okay the list of polishes I used were the following:

- Sally Hansen "Whirlwind White"
- Sinful Colours "Be Happy"
- OPI "You're Such A Budapest"
- Essie "Cascade Cool" (pictured)
- Essie "Navigate Her"
- Essie "Bikini So Teeny"
- Essence "Via Airmail!"
- Essence "Destination Sunshine"

You will also need the following tools:

- Acetone polish remover (for washing out the stippling brush between colours)
- A stippling brush (these can be found at any arts and crafts store that sells painting brushes)
- A cleanup brush (for cleaning around the cuticles)
- A painting palette or a plastic lid (for depositing drops of the polishes onto)

I wanted a look that would match the amazing, sunny spring weather we are getting in Australia and I wanted to try a different method other than the colour blocking, alternating white and pastel stripes.
I use this technique to give a distressed, patchy look on the collectable models that my husband and I create and paint (I'm a geek and proud of it). So I decided to give it a go with polishes instead of acrylics.

Firstly, I applied the clear base coat to protect my nails and give the polish something strong to adhere to. I followed this up by painting two coats of the fast drying "Whirlwind White: as my undies

After the base white was completely dry (this is REALLY important because if the polish is still even slightly wet it will move around and may come off the nail when you start stippling the coloured polishes over the top) I started with my first colour, depositing a small amount of the polish onto my palette and dipped my stippling brush into it and then dabbed it a few times to make sure that there isn't too much of the polish of the brush (if there is too much the polish will turn out as a big blob rather than the watery and textured look that is needed to achieve this manicure).

Next, I gently started stippling the polish in small sections on to each nail until I was happy with the look. I repeated steps one and  two for each colour, sometimes twice in the same spot to crate a stronger pigmentation on some areas, ensuring that there were no white gaps and I was happy with the look I waited for it to dry completely (to prevent any streaking between colours) and then applied a gel-look top coat and quick dry topcoat (both by Essence) and ta da! the manicure was complete!

If you have any questions about this post, please post a comment below and I will do my best to answer it.

Goodnight my lovely ones!

xoxo
Queen Bee

Review: Revlon "Blue Lagoon"

Hey lovely people!

I recently created some basic level nail art using Revlon's "Blue Lagoon".

I thought I would mix things up a bit and review this polish out of order as a part of Swatchfest 2013, so here goes!


Revlon: Blue Lagoon.

This polish is incredibly creamy and a dream to apply, I have used it countless times as a plain manicure or as a base for more elaborate nail art. It is a baby blue creme with a slight silver sheen that is still visible when applied on the nail. It has an amazing coverage with no patchiness and/or streaking, it goes opaque in as little as two coats.

I have absolutely fallen in love with this colour since the first time I saw it on the shelf. It was very appealing to me as I love good strong creme polishes and I have always been a sucker for a good pastel.

The formula goes on incredibly smoothly and has an amazing consistency (not too thick and gluggy but not so watery it goes everywhere). The drying time varies from incredibly quick (if you normally apply multiple thin coats) to moderate (if you tend to apply your polish thinker with fewer coats).

I have used this polish as a base for stamping, it was really helpful as it dries evenly and doesn't 'smoosh' (aren't you loving my serious terminology lol!) when the rubber stamper is rolling over the polish to apply the stamp. It is also awesome for things such as dotted manicures because it doesn't tend to go stringy as the polish dries out and you continue stamping.

So overall, I would have to give this polish a (perfectly manicured) thumbs up and recommend you all to go out and buy it and give it a try. It should be available anywhere Revlon is sold such as, department stores and you local pharmacy.

See you later lovely people!

xoxo
Queen Bee

Tuesday, 5 November 2013

Sincerest Apologies!

Hey Everyone!

I know I have been AWOL for a few weeks and I sincerely apologise and ask for you to bear with me!

I am having a few complications with my health and between running from specialist to specialist, getting scans and now being on doctor ordered bed rest (ugh!) I haven't had many opportunities to jump on here to create full posts.

Me, Stuck in bed...

All this being said, I have managed to take a few hours over the past day or two to cook up some good posts for you to all enjoy which will be posted over the next few days. I am also getting my husband to create an area that is completely dedicated to polish but allows me to stay on bed rest as per doctors orders.

I hope that you all can bear with me for a little while longer but I promise that I haven't forgotten you all!

xoxo
Queen Bee

Awesome stuff to come!

Hey lovely people!

I am very excited about the next nailart creation that is coming up on both here and on my instagram account (personal: @princesslea89 and blog: @queenbeepolishes). 

All the polishes required to complete the manicure.

I have come up with an idea of using a technique I use in my hobby model building and painting (I'm a geek and proud of it).

This idea could either look really really cool or fail exponentially... either way I'm going to post the results here first!

Keep your eyes peeled for the outcome!

xoxo
Queen Bee

Friday, 25 October 2013

Swatchfest 2013: Essie Collection Part 4.

Hey Everyone!

The Swatchfest continues so let's get started!

Essie: Demure Vixen.


A really sheer polish that has a subtle purple shimmery glow when light hits it. This polish would be perfect for someone who needs to have naked nails for work/school but wants to cheat (I don't know about others but I can't stand to have naked nails for too long!). It can also be used as a top coat for other polishes. It is fairly easy to apply because there is no need to worry about streaks or patchiness. The formula has an amazing drying time with a really smooth consistency.

Essie: Hot Coco.


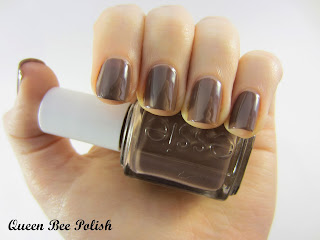
This gorgeous creamy brown really does resemble a warm hot chocolate and is perfect for a manicure to warm you up on a cold winter's day. It has a thin consistency with a quite disappointing application. I don't know whether it was the way that I was applying the polish but I found it quite hard to get it to look consistent on my nails. I needed to use quite a few coats to stop it from looking streaky and patchy, also the drying time was a bit average. Despite this I still love the colour and the fact that it looks really glossy once applied. I was left feeling a bit undecided about this one.

Essie: Smoking Hot. 


This perfect winter shade is a creamy grey with a hint of purple mixed in. This polish makes me feel really sophisticated and I received a number of positive comments during the time that I wore it. It looks amazingly glossy so there wasn't really any need to apply a top coat, it has an amazing drying time is opaque in three coats and perfect for those girls who are rocking nubbins. This one will definitely be one of my favourite go-to's.

Essie: Decadent Diva.


This metallic maroon polish contains an additional fine copper glitter that shows up spectacularly in the sun. It is slightly sheer but can become opaque if you apply a decent number of coats which is easy because of the thin formula. The copper sheen is clearer than can be seen once applied to the nail. This polish is another one that you could seriously rock if your nails tend to be on the short side (like mine lol!).

That's all for now so keep your eyes peeled for the next instalment! 

xoxo
Queen Bee.

Sunday, 20 October 2013

A Refreshing Break.

Hey everyone!

I thought that I would break up the monotony of the constant swatching, so here goes!

To start off with, I have a dirty little secret! I recently bought my first two OPI polishes during an Ozsale promotion (cue the gasps and looks of horror!). It isn't like I don't like OPI polishes, I just have never bought one for myself, I mainly reserve the more expensive polishes for anniversary, birthday and Christmas wish-lists.


The first polish that I decided to buy was "Honey Ryder" which is a liquid sand from the James Bond Anniversary Collection.


Now, despite all the rave reviews that were all over Instagram, I wasn't sure that I would like like the consistency of the formula because I am one of those people that can't stand having lumpy polish because I have the overwhelming desire to pick at the lumps. But when my friend bought me the liquid sand mini's pack I thought to myself "why not give it a go?" and it turns out that I absolutely LOVE IT!  Also, because the mini's pack didn't include Honey Ryder and that is the one that I wanted the most, when I saw it on Ozsale I jumped at the chance to get it.  

Honey Ryder is a gorgeous gold with a variety of gold glitter, the rough, textured formula has an amazing coverage, and you will only need one to two coats for maximum coverage. It also has an incredible drying time and it has a bonus, if you plant your finger on it while it is wet, it's so textured that the finger/pillow print blends into the textured surface.

The second polish purchased was You're Such a Budapest! this polish is a gorgeous strong lilac that looks incredibly creamy once applied. I'm a complete sucker for purples (my room is painted about 4 shades of purple lol). It requires a few coats to get it completely opaque. I used 4 but they were incredibly thin (on purpose) I loved the drying time, in fact, I find all the OPI polishes that are in my collection have amazing drying time which is a bonus.


In summary, I am very impressed with both polishes and they have enticed me into looking into purchasing more OPI's.

In the next few days I will be posting another post continuing Swatchfest 2013 so keep your eyes peeled!

Love you all!
xoxo
Queen Bee

Thursday, 10 October 2013

Swatchfest 2013: Essie Collection Part 3.

Hey Everyone!

I am slowly getting through the Essie portion of the challenge. As my favourite 'luxury' brand, my Essie certainly is a large portion of it.

Anyway, on to the reviews!

Essie: Cascade Cool.


A gorgeous creamy hot pink which borders on a Barbie pink (not that it's a bad thing, we all love Barbie hey?). It is really easy to apply with a smooth formula that has an incredible drying time that is even yet slightly sheer (the tips of the nail are slightly visible through the polish). I used two coats plus topcoat for the image above.

This colour would look amazing on all skin types from a gorgeous tan to a smooth pale (like mine) I find it hard to find pinks that suit my complexion but this one fits the bill.

Essie: Fiji.


First of all I have to say I FREAKING love this polish. It has to be one of my all-time favourites and a definite go-to over and over again.

It is an incredible, soft light pink creme pastel that has a really impressive colour intensity. I only used three coats plus topcoat for the image above (the third coat isn't necessary but I used it to ensure even coverage for the photos). This pastel pink is a gorgeous colour that is perfect for a soft, girly look (and also perfect for a wedding manicure!).

Essie: Haute As Hello.


This creamy orange makes for a good statement nail or undies for nail art. I originally purchased this polish for nail art but have slowly grown to like it more and more each time I wear it. As much as I like this colour on me, I have no doubt that it would look amazing on a tan complexion. This polish has an incredibly strong pigment and as I applied it I noticed that it didn't apply patchy (like some other Essie pastels).

There are two things that I should mention though, first one it that the formula dries semi-matte (I don't know whether this is because I used a matte base coat but I would love to hear you experiences with it). The second is that it does dry darker than in the bottle. Neither of these should be the reason that you don't give this polish a try, it's worth it!

Essie: Braziliant.


The first time I saw this polish on the rack at the store I had to buy it because it was so unique. It is an extremely bright burnt orange with an orange shimmer that is strong on the nails. It has a smooth, easy application and is opaque in two coats. I am using this polish for nail art as I find it way too bold and intense for my skin tone but this colour is perfect for someone who likes to make a statement.

Well, I'm signing off to do some more swatches so that I can bring them to you!

Love you all!
xoxo
Queen Bee

Sunday, 6 October 2013

Swatchfest 2013: Essie Collection Part 2.

Hey lovely people!

This post is a continuation of Swatchfest 2013. I am really enjoying doing this challenge because I am finding some amazing gems that I have previously overlooked.

To add to the challenge, I have decided to go on a self-enforced no-buy until I have completed Swatchfest. This will be a real challenge in itself because (as most of you fellow nail addicts can understand) I have a serious polish buying problem.

So, now on to the reviews!

Essie: Lilacism.


This gorgeous, girly polish is a light purple pastel with subtle grey undertones which is absolutely perfect for a spring manicure or simply a mani to brighten your day and make you feel a little girly. The formula is amazing, it goes on the nail really smoothly with no patchiness and it has an impressive amount of pigmentation. It is completely opaque in as little as two coats. I would definitely recommend this polish for those looking for a softer look or just those that want their manicure to make them feel girly.

Essie: Navigate Her.


Firstly, I have to admit that my husband (being the dirty minded male that he is) absolutely cracked up when he first heard the name of this polish. Personally, I don't see what he finds so hilarious. Anyway, on to the actual serious review.
Navigate Her is a strong khaki green creme pastel. It is incredibly pigmented, needing a maximum of two coats to become completely opaque. Personally, I didn't really like this colour against my pale skin tone (seriously, my skin hasn't properly seen sunlight in over a year, let alone become tanned). But this is most certainly won't be the case with everyone, I'm just stating my personal experience, I encourage everyone to give it a go if you want to. the formula applies beautifully with an amazingly even coverage. I would recommend this polish for those that don't mind doing things a little different.

Essie: Bikini So Teeny.
 

I have to admit that this polish was a HUGE lemming of mine and still remains as my favourite Essie polish, so much that I have three bottles (oops!). This gorgeous polish is a creamy sky blue with a slight blue to silver shimmer. It doesn't apply evenly for the first coat (as I find is the case for most Essie polishes) but after 2-3 coats it is completely even and opaque. I love this polish because it give a freshness that I really look for in a summer polish. I don't like wearing dark polishes during summer as I find that they can drag down a colourful summer outfit. Also, sadly the shimmer that is so strong in the bottle sort of disappears on the nail but then also gives it more of a lightening effect.

Anyway lovelies, keep your eves peeled for the next instalment in this challenge.

Love you all!
xoxo
Queen Bee

Swatchfest 2013: Essie Collection Part 1.

Hey lovely people!

If you read my last post you would know that I am undertaking the challenge of Swatchfest 2013 (a.k.a. swatch every polish in my current collection). So here is my first entry of many... this is gonna be interesting!

Essie: To Buy Or Not To Buy.


This polish is an absolutely gorgeous lavender creme with a subtle blue and purple shimmer which compliments and brightens the polish although it doesn't show up much on the nails. This polish requires at least 3 coats to get it appearing smooth and opaque as the formula is very sheer and slightly streaky on the first couple of layers (like the majority of Essie pastel and lighter polishes). Overall I'm impressed with this polish and am going to continue using it.

Essie: Absolutely Shore.


This polish is a gorgeous light pastel green. I found the formula a bit disappointing, it was hard to get an even consistency causing bad streaking. You will also need at least three coats in order to get it opaque. I love the way it looks with my (very) light skin, normally greens make me look jaundiced but this one it kinda cute. Despite the problems with the formula I kind of like it, it won't be one of my frequently reoccurring polishes but I will use this one again, maybe for an accent nail or undies for a design.

Essie: Mint Candy Apple.


I have to admit, this polish was a lemming of mine for a LONG time. I instantly fell in love with the gorgeous fresh colour and it looks AMAZING against my (very light) skin. The formula of this polish is absolutely amazing, it is has a really easy application, no streaks at all and is opaque in two thin coats. I absolutely love this polish and will for a very long time, this colour is one of my top 10 polishes and I will wear it over and over.

Keep your eyes peeled for another Swatchfest 2013 post.

xoxo
Queen Bee

Saturday, 5 October 2013

Swatchfest 2013

This is my first real entry for this blog so I thought I would start it off with a bang!

I was inspired by a post that Zombified Nails did on Instagram. The challenge was to swatch every polish in your current collection. I saw this and thought to myself "why not? I'll give it a go!" I am using this challenge to rediscover old favourites, find new ones and give others a second chance.

Each post in this series will comprise of 2-5 polish swatches with a review per swatch. I aim to add to the Swatchfest a few times a week (I'm a bit slow at the moment, I'm still attempting to figure out everything haha!) if you would like to receive email notifications when the posts are up, please provide the necessary details in the box on the right side of the page. 

I will also be posting my images on the Queen Bee Instagram (search @queenbeepolishes) so feel free to check them out there too!

I invite everyone to see if they can complete this challenge with me! If you do, link your images to #queenbeeswatchfest on Instagram!

xoxo
Queen Bee.
 

Blog Template by BloggerCandy.com